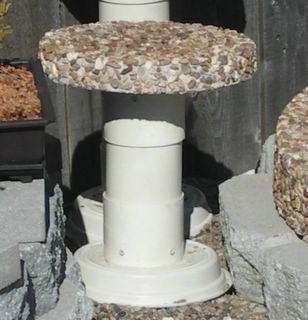
 Completed plant stand may need additional rocks or dirt to level the plant stand if it is sitting on a slope. The PVC pipe is very cheap if purchased in 10 foot lengths. The couplings are about $1 each, and the drip pan price will vary with the size of the drip pan, but it is very important not to try to save money by using a small drip pan. The larger drip pan will hold more cement and make the stand more stable and easier to level.
Wednesday, October 12, 2005
Completed DIY PVC Bonsai Stand
Completed PVC Bonsai Stand
 Completed plant stand may need additional rocks or dirt to level the plant stand if it is sitting on a slope. The PVC pipe is very cheap if purchased in 10 foot lengths. The couplings are about $1 each, and the drip pan price will vary with the size of the drip pan, but it is very important not to try to save money by using a small drip pan. The larger drip pan will hold more cement and make the stand more stable and easier to level.
 Completed plant stand may need additional rocks or dirt to level the plant stand if it is sitting on a slope. The PVC pipe is very cheap if purchased in 10 foot lengths. The couplings are about $1 each, and the drip pan price will vary with the size of the drip pan, but it is very important not to try to save money by using a small drip pan. The larger drip pan will hold more cement and make the stand more stable and easier to level.

2 inch screws in one half of PVC coupling
Drill a pilot hole for the four deck screws into each of the 4" PVC couplings. Cement will fill this half of the coupling, the PVC pipe will be inserted into the other end of the coupling after sanding the PVC pipe with sandpaper so it may be inserted into the coupling easier.
DIY PVC Bonsai Stand
 Materials required are two 4 inch couplings, plastic drip pan for pot, round paver stone, four 4" deck screws, eight 2 inch deck screws and cement glue.
The tools I used were a power drill to drill the holes, and to screw in the deck screws.
The longer the length of PVC pipe, the larger the plastic drip pan needs to be. It is leveled, then filled with cement. After the cement has set, turn the drip pan upside down. Place the coupler on top of the drip pan with the vertical screws sticking out of the drip pan into the bottom of the PVC coupler. The screws in the coupler should be in the bottom half of the coupler. Fill the bottom of the PVC coupler with cement and allow to set. The top PVC coupler is placed on a sheet of plastic and the bottom half with the deck screws is filled with cement.
After all of the cement has set up, insert the PVC pipe into the bottom coupler, then insert the PVC pipe into the top coupler. Center and glue the round paver onto the top PVC coupling.
Hanging Strawberry Planter

PVC Hanging Strawberry Planter
I cut a three foot length of 4 inch PVC pipe, glued a end cap to the bottom. Next I drilled a hole in the center of the end cap large enough for my drip irrigation hose. Then I pushed the drip hose into the hole in the PVC end cap until it came out the top. I drilled 1/2 inch holes for the strawberry plants. I drilled a hole in the top of another 4 inch end cap and added the eye hook with a small chain to attach it to the planter. I added another chain to the end of the PVC pipe to hang the planter to the bracket. I started a few strawberry plants and waited for the runners to develop. I would push a runner into another hole where it would grow.
Subscribe to:
Comments (Atom)


