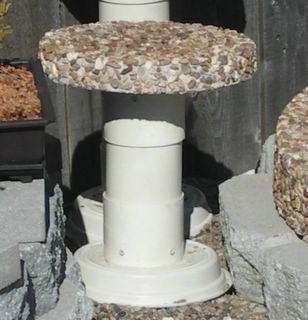
 Completed plant stand may need additional rocks or dirt to level the plant stand if it is sitting on a slope. The PVC pipe is very cheap if purchased in 10 foot lengths. The couplings are about $1 each, and the drip pan price will vary with the size of the drip pan, but it is very important not to try to save money by using a small drip pan. The larger drip pan will hold more cement and make the stand more stable and easier to level.
Wednesday, October 12, 2005
Completed DIY PVC Bonsai Stand
Completed PVC Bonsai Stand
 Completed plant stand may need additional rocks or dirt to level the plant stand if it is sitting on a slope. The PVC pipe is very cheap if purchased in 10 foot lengths. The couplings are about $1 each, and the drip pan price will vary with the size of the drip pan, but it is very important not to try to save money by using a small drip pan. The larger drip pan will hold more cement and make the stand more stable and easier to level.
Completed plant stand may need additional rocks or dirt to level the plant stand if it is sitting on a slope. The PVC pipe is very cheap if purchased in 10 foot lengths. The couplings are about $1 each, and the drip pan price will vary with the size of the drip pan, but it is very important not to try to save money by using a small drip pan. The larger drip pan will hold more cement and make the stand more stable and easier to level.

2 inch screws in one half of PVC coupling
Drill a pilot hole for the four deck screws into each of the 4" PVC couplings. Cement will fill this half of the coupling, the PVC pipe will be inserted into the other end of the coupling after sanding the PVC pipe with sandpaper so it may be inserted into the coupling easier.

DIY PVC Bonsai Stand
 Materials required are two 4 inch couplings, plastic drip pan for pot, round paver stone, four 4" deck screws, eight 2 inch deck screws and cement glue.
The tools I used were a power drill to drill the holes, and to screw in the deck screws.
The longer the length of PVC pipe, the larger the plastic drip pan needs to be. It is leveled, then filled with cement. After the cement has set, turn the drip pan upside down. Place the coupler on top of the drip pan with the vertical screws sticking out of the drip pan into the bottom of the PVC coupler. The screws in the coupler should be in the bottom half of the coupler. Fill the bottom of the PVC coupler with cement and allow to set. The top PVC coupler is placed on a sheet of plastic and the bottom half with the deck screws is filled with cement.
After all of the cement has set up, insert the PVC pipe into the bottom coupler, then insert the PVC pipe into the top coupler. Center and glue the round paver onto the top PVC coupling.
Hanging Strawberry Planter

PVC Hanging Strawberry Planter
I cut a three foot length of 4 inch PVC pipe, glued a end cap to the bottom. Next I drilled a hole in the center of the end cap large enough for my drip irrigation hose. Then I pushed the drip hose into the hole in the PVC end cap until it came out the top. I drilled 1/2 inch holes for the strawberry plants. I drilled a hole in the top of another 4 inch end cap and added the eye hook with a small chain to attach it to the planter. I added another chain to the end of the PVC pipe to hang the planter to the bracket. I started a few strawberry plants and waited for the runners to develop. I would push a runner into another hole where it would grow.
Monday, August 22, 2005


Wednesday, June 08, 2005
Lowes $11 trash container

Lowes 34 gallon container with a flat side which would be easier to attach a hose fitting.
The fitting must be attached as low as possible on the trash container or tote box. This will allow gravity to empty most of the water in the container through the valve controlled by the timer. The timer is powered by three 'AAA' batteries.
Multiple containers may be use if more water is required. A 'tee' can join two containers, or many conatiners may be daisy-chained together to hold as much water as required. It is very important to have water tight connecters at the bottom of the container, otherwise the water will drain and will not be available to water your plants as many days as you figured on this setup providing water for your plants.

Materials to assemble watering system
This is a gravity flow system and does not require a pressure regulator or back-flow preventer. Do not attach to your water system without these safety devices!

Materials to assemble watering system
labeled on photo of assembled system

1/2 inch adapter for the container with hose fitting
'Y' hose adapter
double female hose fitting
pipe to hose adapters

Materials to assemble watering system
labeled on photo of assembled system

1/2 inch adapter for the container with hose fitting
'Y' hose adapter
double female hose fitting
pipe to hose adapters
Vacation Watering Setup
| This is a gravity flow system and does not require a pressure regulator or back-flow preventer. Do not attach to your water system without these safety devices! |
 Battery powered irrigation for potted plants (water tank not shown). |
Attaching this system to a rain barrel would be the perfect solution, but the cost is much higher than a trash barrel!! |
| Materials: |
| ½” Electrical Conduit Which Will Fit Inside Of Hose |
| Adjustable Drip Emitters (1 for each pot) |
| 6” Stakes (1 for each pot) |
| ¼” Tees (1 for each pot) |
| ¼” Hose (length determined by pot placement) |
| Hose ‘Y’ Connecter |
| Double Female Hose Connecter |
| 6 – ¼” Outlet (adjustable) |
| Garbage can, tote box, or plastic container to hold water, which you can make watertight where the water hose attaches. |
Tuesday, May 31, 2005


Tomato & Strawberry Update
Tomato Plants:
Setting fruit; twelve cherry tomatoes May 22, six grape tomatoes May 24, four beefsteak tomatoes May 24.
Started from seed in my greenhouse earlier this year.
Bell pepper Plants:
Setting fruit; two green bell peppers May 27, four May 30.
Strawberry plants:
Two ripe strawberries May 25, twelve ripe strawberries May 29, four ripe strawberries May 30.
Purchased dry root stock from Burgess (http://www.eburgess.com/).
Sunday, May 08, 2005

Tuesday, April 05, 2005
110 Volt Micro-Controller Interface

Years ago, I built this controller to switch 110 volts with a printer port on my computer. I am adding a micro-controller so my computer will not be required in the greenhouse. Each one or all of the six A/C lines may be switched on or off.
Micro-controller On Test Bench

Test setup of a micro-controller controlling a 3/4 inch sprinkler valve. A transister is used to detect the 5 volt signal and turn on the 12 volts for the valve. Although the valve is rated at 24 volts, the actual voltage at the valve after running 50 to 100 feet of wire to the valves will be lower than 24 volts. These valves functioned very well with 12 volts. The transister is rated for 30 volts, so if required, a different power supply (wall wart) could be changed out.
This setup functions well, I am adding additional devices to be controlled by the micro-controller:
Watering Strawberry Plants

Strawberry plant being watered with an adjustable drip head. This device allows adjusting the amount of water delivered and it is set to just trickle. This allow more devices on the 1/4 inch hose, but it requires 4 minutes to deliver the amount of water required.
One thing to remember when using drip irrigation; you can lower the amount of water delivered and increase the time the valve is on to get the required amount of water to the plants.
Trees Watered With Drip Irrigation
Various plants will be watered when their zone is watered. I have one zone on my sprinkler system which only controls drip irrigation devices. This allows me to water using drip irrigation for a shorter length of time than I water the grass in the yard.
Extension Required To Install Drip Irrigation

This is a six inch extension which is needed when the sprinkler head is removed and a four or six drip hose adapter replaced a sprinkler head. Useful when an entire zone is for drip irrigation and used when the sprinkler device is replaced with multiple drip hose connector.
Sprinkler device & 1/4 hose

This adapter is installed between the sprinkler head and the sprinkler pipe allowing a single drip hose to be attached. Although it only feeds a single 1/4 inch line, it allows the sprinkler device to be re-attached. Disavantage is the 1/4 inch line is on for the full time the sprinkler device is on.
4 Hose Adapter For Drip Irrigation

This is a different type of drip adapter. It also will replace the sprinkler head. It allows four 1/4 inch drip hoses to be attached in place where the sprinkler head was removed. Again, the number of devices it will feed is determined by the type of attached devices. If the device has an adjustment, it may be turned down, which will enable additional devices to be attached.
Six Hose Adapter For Drip Irrigation

This adapter will replace the sprinkler head and allow six 1/4 inch drip hose to be attached. The water pressure is reduced and each connection can feed multiple watering devices. How many it is capable of feeding is determined by the amount of water each device meters out. Some devices allow adjustments, other don't have any adjustment.
Ocean Breeze Mist Device

The mister head in installed with wire ties. The support is 1/2 inch PVC pipe. I have a 3 volt fan mounted in a 3 inch PVC pipe which will blow the mist around the greenhouse. Should move enought air to avoid water on the leaves of the plants on the shelves. The Ocean Breeze kit cost under $25 and I have 7 mist devices left. One may be installed in the 4' x 4' greenhouse. Depends on how well it lowers the temperature without getting water on the plant leaves.
Plans are to pulse the mister on for 20 seconds, then off for two or three minutes. After installing the valve and controller, I will record the starting temperature, time on, time off, amount temperature is lowered and if there is water on the plant leaves. The time on and time off will be easy to modify. The valve is a standard yard sprinkler system device, and should cycle this often without any problem.
If there is a problem and the heat goes over the programed limit, the alert will enable me to see what the problem is and correct the problem (unless I am away from home). Plants die very quickly when it is hot. Dries up the soil, and the plants wilt!
Ocean Breeze Mist For Cooling

My first concern was the low over-night temperatures. A oil-filled heater on sale at Wal-Mart was purchased and a 20K BTU natural gas heater was ordered from Harbor Freight. My second concern was the peak daytime temperatures. I decided to use a water mist system to lower the temperature in the greenhouse .The Ocean Breeze kit contained 10 mist heads, I installed three in the top of the greenhouse.
Currently I open the vent and turn on the mist system manually. Within a couple of weeks I should have the embedded system tested and installed. It will monitor the temperature and controll the water to the Ocean Breeze and the fan. The vent will be self opening and closing using a standard greenhouse vent control.
In addition, I will have a 12 volt fan installed to vent the inside air. Additional devices will be added after testing on the bench.
6'x8' Master Gro Greenhouse
 The 6' x 8' greenhouse blocks the view of the smaller 4' x 4' greenhouse. The instruction said to allow four to six hours to assemble, but it required the full six hours for us. The first evening we sorted the items and assembled the base. The next morning we completed the greenhouse just before lunch. A single item was missing and a call to the manufacture got that part on the way.
Wednesday, March 30, 2005
A Little About The Author

Laris Pickett
I am interested in robotics, plants and photography. I started building electronic devices in grade school. My older brother was also interested so we could share electronic magazines and order electronics together, saving shipping charges.
Scratch built robots means obtaining wheels, motors and the means to control speed and direction. I have used PIC chips, Basic Stamps, Lego Mindstorm, Dios (Kronus Robotics) with various support chips. Seemed natural to extend these skills into the greenhouse this year and retire the X10 devices.
Tuesday, March 29, 2005
Greenhouse Automation
Last summer I started plants in my 4' x 4' greenhouse and watered the plants inside and on the west side of this greenhouse using a 3/4 inch irrigation valve connected to drip irrigation devices. The valve was controlled by an X10 module with a 110 volt AC to 12 volt DC wall wart (power supply). I used ActiveHome software on my computer to turn the valve on and off at preset times. I could also use my X10 remote to turn on or off the valve. This made it easier to show friends and neighbors how the system functioned.
For my 2005 garden, I purchased a 6’ x 8’ Master Gro greenhouse and assembled it on the south side of my house. I plan on using X10 to automate the 110 volt fan, open and close the vent. I have installed my drip irrigation for the plants in the greenhouse. I also use drip irrigation for my potted plants with water supplied from my yard irrigation system. I also will use an embedded system to monitor the temperature of the greenhouse air and soil temperature and display them in my house. Later X10 devices will be replaced with a microprocessor to control 110 volt AC devices, 12 volt devices, and sensors.
Greenhouse devices:
An alert if the temperature is too cold or too hot in the greenhouse
Vent opened at a set temperature
Mist and fan turned on at a set temperature
Smoke alarm
Currently I have 80 plants growing in the greenhouse, and I am getting ready to move some of my tomatoes to my hydroponic system.
For my 2005 garden, I purchased a 6’ x 8’ Master Gro greenhouse and assembled it on the south side of my house. I plan on using X10 to automate the 110 volt fan, open and close the vent. I have installed my drip irrigation for the plants in the greenhouse. I also use drip irrigation for my potted plants with water supplied from my yard irrigation system. I also will use an embedded system to monitor the temperature of the greenhouse air and soil temperature and display them in my house. Later X10 devices will be replaced with a microprocessor to control 110 volt AC devices, 12 volt devices, and sensors.
Greenhouse devices:
Currently I have 80 plants growing in the greenhouse, and I am getting ready to move some of my tomatoes to my hydroponic system.
Subscribe to:
Comments (Atom)
